Margarita Cake Ball Truffles {margarita cupcake's little sister}

July 28, 2011


Introducing ... margarita cupcake's little sister!  Yes, it's Margarita Cake Ball Truffles.  The same great lime, Cuervo Gold tequila, and salt flavors as big sis - but in a cute little bite-sized treat.  Want me to pour you a glass?  Or two?

Completely random side note.  Ever since I thought of the title of this post ... ya know, referring to these as cupcake's little sister ... I've had Elvis running through my head.  Come on - you know the song! 
"Little sister don't you ...
Little sister don't you ...
Little sister don't you kiss me once or twice
then you say it's very nice and then you run. 
Little sister, don't you do what your big sister done."

Just in case you're not familiar with the song, I ventured out to YouTube and grabbed a clip for you.  Truth be told, I really just wanted this song to get stuck in all of your heads, like it has been in mine all day!!  My Mom has always said I have a jukebox in my head!


 Well, now that we're done with my random stream of consciousness about Elvis, let's get back to Margarita Cake Ball Truffles. 

Bake a yellow cake, crumble it up (my favorite part!), and then grate in the zest of a couple of limes.   


You could also bake the lime zest into the cake itself, but I think the lime flavor comes through in the cake ball truffle more strongly if the zest goes in post-baking. The lime flavor has to compete with the vanilla candy coating, so I think it needs to be a bit 'strong.'

Stir in some frosting, roll the mixture into balls, dip them in vanilla candy coating, and sprinkle with course salt.  Mmmmmm ~ Margarita cake ball truffles.  (See this post for cake ball truffles step-by-step instructions and photos.)

Oh, and please note, Elvis has left the building.


Margarita Cake Ball Truffles
Source:  Cake ball concept & process adapted from Bakerella; frosting inspired by top-shelf margaritas; method adapted from The Best Recipe by the editors of Cook's Illustrated magazine, Vanilla Buttercream

(Printable recipe)
Ingredients
Cake & Coating:
1 baked 9x13" yellow cake
Zest of 2 limes
1 (1 lb.) package vanilla candy melts
About 2 T. shortening
Green sprinkles (optional)
Fleur de sel or course sea salt

Margarita Buttercream Frosting:
1/2 lb. (2 sticks) unsalted butter, softened
2 c. confectioners' sugar
3 T. fresh lime juice
1 T. Triple Sec
1 T. Cuervo Gold tequila
2 T. lime zest
1/16 tsp. salt


Directions
Prepare the Frosting:
1.  Beat butter in bowl of an electric mixer on medium speed until fluffy, about 1 minute. Reduce mixer speed to low. Add confectioners' sugar, 1 cup at a time, beating for a few seconds between each addition.

2.  Increase mixer speed to medium and beat for about 3 minutes.

3.  Add remaining ingredients (starting with 1/16 tsp. salt); beat on low speed to combine. Scrape down sides and bottom of the bowl. Increase mixer speed to medium and beat until fluffy, about 4 minutes.

Prepare the Cake Ball Truffles:
4.  Crumble cake into a large bowl, working it into small crumbs. Stir in the lime zest.  Add 1 to 1 1/2 cups of the prepared margarita buttercream frosting and mix until well combined.

5.  Shape into approximately 1" balls, using about 1 T. dough per ball; set aside on wax paper. Cover with plastic wrap and refrigerate for about 1 hour, or place in freezer for about 15 minutes.

6.  In a small deep bowl, melt candy melts and shortening together in the microwave per candy melt package directions (typically in 30 second intervals, stirring in between).

7.  Use a fork to dip each cookie dough ball in the candy coating, letting excess coating drip off back into the bowl. Place on wax paper. Sprinkle with a few green sprinkles and a bit of salt. Let stand for candy coating to set up.

Enjoy!


16

Margarita Cupcakes with Margarita Buttercream Frosting

July 26, 2011
Hint-of-lime Margarita cupcakes with light and fluffy Margarita buttercream frosting.


Hint-of-lime cupcakes topped with margarita buttercream.  Any takers? 

These were inspired by a family friend's top-shelf margarita recipe.  And I love them!!  The cupcakes, that is.  Well, and the margaritas, too.  On the rocks.  Sorry, but I'm not a fan of that frozen give-me-an-ice-cream-headache stuff.  On the rocks, for me, baby.

The cupcakes themselves have just a hint of lime ... my favorite vanilla cupcake batter with the zest of a couple of limes grated in.  When I was developing this cupcake, I was hoping I could get a touch of lime flavor simply by adding zest - and I did!  I was very excited when this method worked and gave me just the touch of lime I was looking for.

The cakes are then frosted with margarita buttercream ... that's the part inspired by the top-shelf margaritas.  Take basic buttercream with a little lime juice, lime zest, Triple Sec, Cuervo Gold tequila, and a pinch of salt and you've got margarita buttercream.  Tasty.  Word of caution - the salt takes over the flavor of the buttercream pretty easily, so go easy.  I used about 1/16th of a teaspoon, and felt that came out about right.

Sprinkle the frosted cupcakes with a little lime zest to make them extra pretty, if you'd like - and then dig in.  No blender required.

Thank you for stopping by The Kitchen is My Playground. We'd love to have you back soon


Margarita cupcakes recipe, Margarita frosting recipe, frosting with Tequila
Cupcakes
Tex-Mex
Yield: 12 cupcakes
Author:
Print
Margarita Cupcakes with Margarita Buttercream Frosting

Margarita Cupcakes with Margarita Buttercream Frosting

Hint-of-lime Margarita cupcakes with light and fluffy Margarita buttercream frosting.
Prep time: 30 MCook time: 20 MTotal time: 50 M

Ingredients:

Cupcakes:
  • 1 c. all-purpose flour
  • A scant 3/4 c. sugar
  • 1 1/2 tsp. baking powder
  • Pinch of salt
  • 3 T. butter, at room temperature
  • 1/2 c. whole milk or 2% milk
  • 1 egg
  • 1 tsp. vanilla extract
  • Zest of 2 limes
Margarita Buttercream Frosting:
  • 1/2 lb. (2 sticks) unsalted butter, softened
  • 2 c. confectioners' sugar
  • 3 T. fresh lime juice
  • 1 T. Triple Sec
  • 1 T. Cuervo Gold tequila
  • 2 T. lime zest
  • 1/16 tsp. salt

Instructions:

Prepare Cupcakes:
  1. Put the flour, sugar, baking powder, salt, and butter in mixing bowl. Beat on slow speed until everything is combined and you have a crumb mixture with a sandy consistency.
  2. Gradually pour in half of the milk; beat until the milk is just incorporated.
  3. Whisk together the remaining milk (1/4 cup), egg, and vanilla. Pour into the flour mixture and beat until all ingredients are just incorporated. 
  4. Beat for about another 30 seconds to one minute until the batter is smooth. Do not over mix. Gently fold in lime zest.
  5. Spoon batter into muffin pan cups lined with paper cupcake liners, filling cups 1/2 full. 
  6. Bake at 325 degrees for 20 - 25 minutes, or until light golden and the cake springs back when lightly touched. Cool slightly in the pan before removing cupcakes to a wire rack. 
  7. Cool completely before frosting.
Prepare Frosting:
  1. Beat butter in bowl of an electric mixer on medium speed until fluffy, about 1 minute. Reduce mixer speed to low. Add confectioners' sugar, 1 cup at a time, beating for a few seconds between each addition.
  2. Increase mixer speed to medium and beat for about 3 minutes.
  3. Add remaining ingredients; beat on low speed to combine. 
  4. Scrape down sides and bottom of the bowl. Increase mixer speed to medium and beat until fluffy, about 4 minutes. 
TRACEY'S NOTES:
  1. This recipe makes 12 cupcakes. Fill your cups only 1/2 full, as this batter rises quite a bit. You may feel like there's not enough batter to stretch to 12 cupcakes, but there really is. When I tried dividing the batter between only 10 muffin cups, I had several that rose over the sides of the cups way too much.
  2. The frosting recipe makes enough frosting to generously frost 12 cupcakes.
Created using The Recipes Generator


30

Spicy Pickled Okra ... no canning required

July 22, 2011

Okra is one of my favorite summer vegetables.  I didn't grow up eating it - growing up in Vermont, I think my only exposure to okra was the one or two little pieces you find in some canned vegetable soups.  But I remember I'd always be excited when I found those one or two little pieces in my soup bowl!  I guess I loved okra before I even really knew what it was.

One of my favorite ways to eat okra is pickled.  During winter, I buy it jarred.  But in summer, when I'm fortunate enough to be able to get an ample supply from my mother-in-law's garden or our local farm stand, I make my own.  It's super simple!

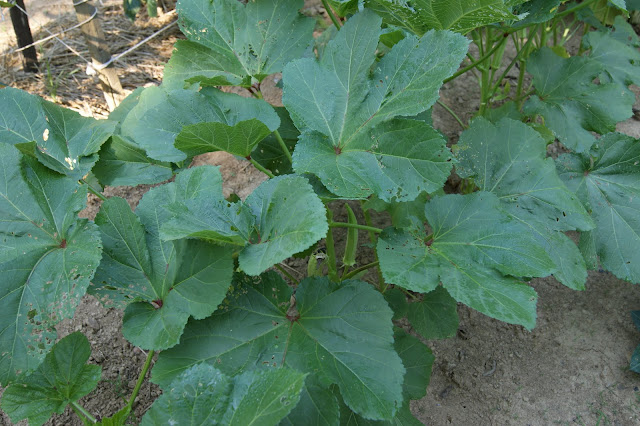
Before we get to the recipe, let me show a few pictures from my mother-in-law's garden.  She has a gorgeous garden!  And she grows lots of things I love.  Like okra.  Here's one of her okra plants.

Okra plant

And here's a baby okra pod growing away on the stem.  I didn't realize that this is how the pods grow until I was introduced to my mother-in-law's garden.  Not sure how I thought it grew, but never thought of it looking like this!

Okra pod

You'll also need fresh dill for this recipe.  I totally didn't need to include this picture of a dill head ... but I think the picture is beautiful and wanted to share.

Beautiful dill head

Now back to the pickled okra.

Combine white vinegar, water, and a whole bunch of spices in a saucepan.  Bring it to a boil ...

Pickling mixture

... and add in fresh dill heads, some jalapenos, and your okra pods.

Okra dives in for a swim!

Let it all cool down to room temperature, and then refrigerate it for a few hours.  Pickling magic will happen, and you'll have delicious and spicy pickled okra!  Yum.

Check out these other classic Southern sides:
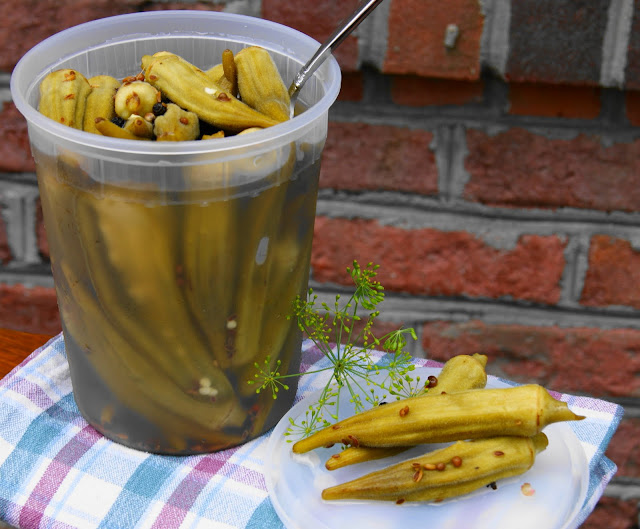
Pickled okra goodness


easy pickled okra recipe, pickled okra without canning recipe, recipes for okra
Appetizers & Snacks
Southern
Yield: varies

Spicy Pickled Okra

Spicy Pickled Okra

Enjoy spicy pickled okra without the hassle of canning!
prep time: 10 Mcook time: 10 Mtotal time: 20 M

ingredients:

  • 2 1/2 c. white vinegar
  • 2 c. water
  • 3 T. granulated sugar
  • 2 T. kosher salt
  • 1 tsp. whole peppercorns
  • 1 tsp. coriander seeds
  • 1 tsp. dill seeds
  • 1 tsp. cumin seeds
  • 4 fresh dill heads
  • 2 jalapeno peppers, halved lengthwise
  • 1 1/2 lbs. small okra pods

instructions:

How to cook Spicy Pickled Okra

  1. Combine vinegar, water, sugar, and all spices EXCEPT fresh dill heads in a large saucepan; bring to a boil. Boil for about one minute, or until sugar and salt dissolve, stirring frequently.
  2. Remove from heat. Stir in fresh dill heads, jalapenos, and okra pods. Cool completely with the pot sitting out at room temperature.
  3. Once cooled, pour mixture into an airtight container; cover and chill.
  4. Okra can keep in the refrigerator for up to about two weeks.
Created using The Recipes Generator


Affiliate links are included in this post. I receive a small amount of compensation for anything purchased from these links, at no additional cost to you. Thank you for supporting The Kitchen is My Playground when you shop at Amazon.com.


13

Salted Chocolate Cake Pops & Cake Ball Truffles ... Step-by-Step

July 20, 2011

One word.  Delicious.  Maybe two words.  Totally amazing!  Well, perhaps three words.  Stroke of genius.  On my friend's part, not mine, that is.

These salted chocolate cake pops (and cake ball truffles) are my absolute favorite flavor of all the flavors I've made.  And I can't take one ounce of credit for them.  See, I have a friend, Jenny, who wanted to learn how to make cake pops and cake balls.  So we planned a day to get together and make that happen.  We decided to make four different flavors - red velvet, chocolate, mocha, and margarita (I'll post about the mocha and the margarita ones sometime soon!).

So how did simple chocolate cake pops turn into absolutely-to-die-for salted chocolate cake pops, you ask?  Well, I had some fleur de sel out for sprinkling on my margarita cake ball truffles.  What's a margarita without a little salt, right?  So I wanted to get that salt element into my cake balls, too.  And here's where Jenny's stroke of genius comes in - after dipping one of her chocolate cake balls in her chocolate coating and sprinkling on a few chocolate jimmies, she reached over into the fleur de sel and sprinkled it on top too.  Genius!  Why didn't I think of that?

One little taste of the new flavor, and we were hooked.  Okay ... maybe two little tastes ... you have to be sure, right?  If you love the classic combination of salt and chocolate, then believe me, you'll love these.

Side note - Just in case you're not familiar with fleur de sel, here's a little about it before we move on to the process of making cake pops and cake ball truffles.  I actually looked it up, because I figured I should tell you a little more than just "it's fancy salt."  So, according to Wikipedia, fleur de sel is a traditional French hand-harvested sea salt.  It's typically used as a finishing salt.  Because of it's high moisture content relative to other salts, it doesn't dissolve when sprinkled on moist foods, and therefore gives food a slight crunch and a slight shimmer.  (Click here if you'd like to read more at Wikipedia.)

Onto making cake pops and cake ball truffles!

The process for making both is pretty much the same ... except cake pops are on a stick, and cake ball truffles are not.  That's all.  And once you've got the process for these down, it's easy to mix it up with trying new flavors.  As I know most of you know, I absolutely cannot take an ounce of credit for the cake pop/cake ball concept or process, either.  We owe that to the ever-fabulous Bakerella!  To learn from the queen-of-cake-pops herself, click for her original video from her appearance on the Martha Stewart show or for Bakerella's site for all-things cake pops.

Here's my version of Bakerella's process ... starring my friend Jenny's hands!

Step 1: Start by making a sheet cake.  For our salted chocolate cake pops and truffles, we started with a yellow cake.  Use any yellow cake ... your favorite go-to homemade version or a box mix.  Whatever you prefer.

Step 2:  Crumble the cake up.  Yes, get your hands in there and turn that cake into a nice crumbly mess.  Jenny and I decided this was our favorite part.  It's like a baker's Play Doh!


Step 3:  Stir your frosting into your cake crumbs ... about 1 to 1 1/2 cups frosting for a 9x13" sheet cake.


Step 4:  Roll the frosting/cake crumb mixture into balls.  Chill the balls for about an hour in the refrigerator or for about 15 minutes in the freezer.  This will make it easier to dip them in the chocolate coating, coming up next.


If you're making cake pops ...

Step 5:  Melt your chocolate coating according to the package directions, typically in the microwave.  Dip a lollipop stick into the chocolate coating ...

... and insert the chocolate-dipped end of the stick about 1/2-way into a cake ball.   

This chocolate "cement" will (hopefully!) keep your cake ball from slipping off the stick when you dip it in the chocolate coating. Despite doing this, I still always end up with a few swimmers. Oh well, an excuse to taste-test, right?!?

Step 6:  Dunk a cake ball into the chocolate coating, gently pushing it straight down and then rocking it backwards once and forwards once.  You want to do this fairly quickly or you'll end up with way too much coating.  Don't stir the cake ball around in the coating ... it'll most likely fall off if you do.


Step 7:  Pull the cake ball out of the coating and let the excess drip off back into the bowl.  You can very, very gently tap your wrist to help with this process, if you'd like.


Step 8:  Immediately, while the coating is still "wet," sprinkle your cake pop with the decoration of your choice ... in our case, chocolate jimmies (or sprinkles ... whichever term you prefer!) and fleur de sel.

Step 9:  Place your cake pop into a styrofoam block, in which you've already punched some holes, to set up.


Step 10:  Eat and enjoy!!


If you'd rather make cake ball truffles, they'll look like this:


I'll be honest - I'd much rather make cake ball truffles than cake pops.  To me, truffles are sooooooo much less tedious.  Still a bit tedious, mind you, but much less so than the pops.  The stick is fun ... but it makes the dipping process more difficult and more time-consuming.  Just my opinion.

For cake ball truffles, follow the same process as above for cake pops through step 4.  Then ...

Step 5: (There are many ways to do this ... this is how I do it ... but experiment and find your own groove!)  Drop a cake ball into the chocolate coating.  Quickly, but gently, roll it around in the chocolate with a fork until it's coated.  Slide the fork under the coated cake ball and remove it from the coating, dragging the bottom of the fork along the rim of the bowl a little bit to remove some of the excess coating.


Step 6: Slide the coated cake ball off the fork onto waxed paper.


Step 7:  Before the coating sets, decorate with the sprinkling of your choice.


Step 8:  Give one (or two ... ) a bite!

And that's how you make cake pops and cake ball truffles!  When I'm in the mood to make these, I make a bunch and store them in the freezer.  Then I can take them out whenever and for whatever I like!


Salted Chocolate Cake Pops & Cake Ball Truffles
Source:  Concept & process adapted from Bakerella, flavor idea from my friend Jenny
Ingredients
1 baked 9x13" yellow cake
1 to 1 1/2 c. chocolate frosting, canned or make your own
1 (1 lb.) package dark chocolate candy melts
About 2 T. shortening
Chocolate sprinkles
Fleur de sel or course sea salt
Lollipop sticks (needed for pops, but not for truffles)


Directions
FOR CAKE BALL CENTERS:  
1.  Crumble cake into a large bowl, working it into small crumbs.  Add frosting and mix until well combined.  

2.  Shape into approximately 1" balls, using about 1 T. dough per ball; set aside on wax paper. Cover with plastic wrap and refrigerate for about 1 hour, or place in freezer for about 15 minutes.

TO DIP FOR CAKE POPS:  
3.  In a small deep bowl, melt candy melts and shortening together in the microwave per candy melt package directions (typically in 30 second intervals, stirring in between). 

4.  Dip a lollipop stick into the chocolate and insert it about half-way into a cake ball; let stand for a few seconds for the chocolate to harden. 

5.  Hold onto the lollipop stick and dunk the cake ball into the chocolate coating, gently pushing it straight down and then rocking it backwards once and forwards once. You want to do this fairly quickly or you'll end up with way too much coating. Don't stir the cake ball around in the coating.

6.  Pull the cake ball out of the coating and let the excess drip off back into the bowl, very gently tapping your wrist to help shake off excess chocolate.  Sprinkle with chocolate sprinkles and a bit of salt.  Place in a styrofoam block to dry.


TO DIP FOR TRUFFLES: 
7.  In a small deep bowl, melt candy melts and shortening together in the microwave per candy melt package directions (typically in 30 second intervals, stirring in between). Use a fork to dip each cookie dough ball in the candy coating, letting excess coating drip off back into the bowl. Place on wax paper.  Sprinkle with a few chocolate sprinkles and a bit of salt.  Let stand for chocolate coating to set up.

Enjoy!


28

The BEST Vanilla Cupcake + the BEST Coffee Buttercream

July 16, 2011
Fluffy & delicious ~ These are truly the BEST vanilla cupcakes with the BEST coffee buttercream frosting.  A double sweet treat, for sure!

The BEST vanilla cupcakes with the BEST coffee buttercream frosting image.  A double sweet treat, for sure!   www.thekitchenismyplayground.com


Happy birthday to my wonderful Mom!!

Yes, today is her birthday, and I just got back from visiting her for her special day.  When I asked her what kind of birthday cake she wanted she replied, "It has to be something small."  She didn't want a big cake that left her with leftovers to eat.

The perfect treat?  Her favorite cupcakes! ... Soft, fluffy-textured vanilla cupcakes with coffee buttercream frosting.  Yum.

Okay, I have a confession.  These are her almost favorite cupcakes.  She actually likes it better when I do these as chocolate cupcakes with coffee buttercream frosting ... she loves that mocha combination.  

My quest for the best vanilla cupcake has been quite an involved and fun process of testing and tweaking.

But I was at the very end of my quest for the BEST vanilla cupcake recipe, with just one tiny little tweak to make to the front-runner recipe.  And I've been working on this quest for a looonnng time ... longer than I'd like to admit.  (How can it be so difficult to find a simple vanilla cupcake that I'm happy with?)    

So Mom made a concession and went with vanilla cupcakes to allow me the opportunity to test this final version.

My quest for the best vanilla cupcake has been quite an involved and fun process of testing and tweaking.  I like a vanilla cupcake that has a fairly fluffy texture, light-&-airy crumb, and a good flavor of vanilla.  Dense, gummy, and tasting of slightly-sweet flour is not for me.  

I believe I've tested ten different recipes, along with testing several rounds of tweaks to the front-runner recipes of those ten.  I've tried cake flour, all-purpose flour, and self-rising flour recipes.  I've tried buttermilk, whole milk, skim milk, and 2% milk as the moistener.  I've tried a cold-oven pound cake cupcake.  I've tried a box mix.  I've tried, I've tried, I've tried ...  

And now I'm pleased to say that I finally have a result I am happy with! 

I believe I've tested ten different recipes, along with testing several rounds of tweaks to the front-runner recipes of those ten.

Before we look at that winning recipe, I'll share a little glimpse into my process.  I start by choosing three or four recipes of whatever I'm questing for - in this case, vanilla cupcakes.  I bake up a small batch of each one, typically 1/2 the recipe of each so I don't end up with cupcakes (or cookies, or whatevers) flowing out of every window in my house.  

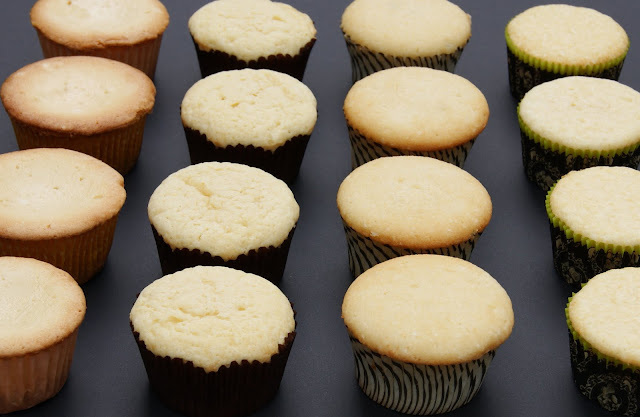
In the case of cupcakes, I use a different color paper liner for each different recipe so I can easily tell them apart and don't get them mixed up in the tasting step.  Here are the four from my last testing round, all lined up and ready for tasting:  

Testing the BEST Vanilla Cupcakes image

Next, I put them through a blind tasting with my husband and me (well, it's not blind for me, since I know which recipe went into which paper liner ... but it's close enough).  Then I involve a friend or two, or my parents, or in some cases - both.

I take all that feedback and decide which recipes need to be scrapped all-together, which are worthy of another try with a tweak or two, or if there's one that's spot-on just as it is.

And my friends involved in this process know that I don't just want them to say, "Oh, that's good."  They have to tell me what exactly they like - the flavor?  The texture?  How it looks?  Then they have to compare, saying things like, "I like the flavor of this one, but I like how light and fluffy this one is."  Then it's back to baking more batches and re-tasting until there's a clear winner!

So, here it is ... the clear winner of the quest for the BEST vanilla cupcake ... ever-so-slightly-modified Vanilla Cupcakes from The Hummingbird Bakery Cookbook.

My friends involved in this process know that I don't just want them to say, "Oh, that's good."  They have to tell me what exactly they like.

I was actually very skeptical of The Hummingbird Bakery's recipe, and considered not even testing it.  

Why?  

Well, it uses much less sugar and much less butter than most of the cupcake recipes out there.  And doesn't sugar and butter make everything good??  And their mixing method wasn't the traditional creaming method.  Instead, you first combine all the dry ingredients with the butter and mix it until you get a crumb mixture ... then add the wet ingredients.  The ever-so-slight modification I made was to increase the vanilla, as the original recipe called for only 1/4 teaspoon, resulting in a too-faint vanilla flavor for me.  With this one small change, these cupcakes were vanilla cupcake perfection!

Now ... on to the coffee buttercream frosting.

This buttercream is so light-and-fluffy, with a fantastic coffee flavor.  It's from my all-time absolute favorite cookbook, The Best Recipe by the editors of Cook's Illustrated magazine.  Beating it the full time called for in each step of the recipe is the key.  It makes it soooo smooth and light ... which is exactly how I love my frosting.  

Add the coffee mixture into a butter & confectioners' sugar mixture ...

How to Make Coffee Buttercream Frosting image

and then keep on beating with a stand mixer or electric mixer it until it's a beautiful light tan color.

How to Make Coffee Frosting image
.
Pipe the coffee buttercream onto the cupcakes with an extra large piping tip, top with a chocolate-covered espresso bean, and there you have it!  

The BEST vanilla cupcake with the BEST coffee buttercream ever.  Happy birthday, Mom!!


Vanilla Cupcakes with Coffee Frosting image
Thank you for stopping by The Kitchen is My Playground. We'd love to have you back soon!


best vanilla cupcakes recipe, vanilla cupcake, coffee buttercream frosting recipe, coffee frosting recipe
Cupcakes
Yield: 12 cupcakes

The BEST Vanilla Cupcake + the BEST Coffee Buttercream

Fluffy & delicious ~ These are truly the BEST vanilla cupcakes with the BEST coffee buttercream frosting. A double sweet treat, for sure!
prep time: 35 Mcook time: 20 Mtotal time: 55 M

ingredients:

Vanilla Cupcakes:
  • 1 c. all-purpose flour
  • A scant 3/4 c. granulated sugar
  • 1 1/2 tsp. baking powder
  • Pinch of salt
  • 3 T. butter, at room temperature
  • 1/2 c. whole milk (I also tried it with 2% milk, and it worked fine)
  • 1 egg
  • 1 tsp. vanilla extract
Coffee Buttercream Frosting:
  • 1 1/2 T. instant coffee granules
  • 1 1/2 T. water
  • 1 1/2 T. vanilla extract
  • 3/4 lb. (3 sticks) unsalted butter, softened
  • 3 c. confectioners' sugar
  • 3 T. milk
  • chocolate covered espresso beans for garnish, optional

instructions:

How to cook The BEST Vanilla Cupcake + the BEST Coffee Buttercream

Vanilla Cupcakes:
  1. Put the flour, sugar, baking powder, salt, and butter in mixing bowl. Beat on slow speed until everything is combined and you have a crumb mixture with a sandy consistency. Gradually pour in half of the milk; beat until the milk is just incorporated.
  2. Whisk together the remaining milk (1/4 cup), egg, and vanilla. Pour into the flour mixture and beat until all ingredients are just incorporated. Beat for about another 30 seconds to one minute until the batter is smooth. Do not over mix.
  3. Spoon batter into muffin pan cups lined with paper cupcake liners, filling cups 1/2 full. Bake at 325 degrees for 20 - 25 minutes, or until light golden and the cake springs back when lightly touched. Cool slightly in the pan before removing cupcakes to a wire rack. Cool completely before frosting.
Coffee Buttercream Frosting:
  1. Combine water, coffee granules, and vanilla extract in a small bowl; stir to dissolve coffee. Set aside.
  2. Beat butter in bowl of an electric mixer on medium speed until fluffy, about 1 minute. Reduce mixer speed to low. Add confectioners' sugar, 1 cup at a time, beating for a few seconds between each addition. Increase mixer speed to medium and beat for about 3 minutes.
  3. Add the coffee mixture and milk; beat on low speed to combine. Scrape down sides and bottom of the bowl. Increase mixer speed to medium and beat until fluffy, about 4 minutes. Frosts 18 cupcakes.
TRACEY'S NOTES
  1. This recipe makes 12 cupcakes. And it really does make 12! Fill your cups only 1/2 full, as this batter rises quite a bit. When I divided the batter between only 10 muffin cups, I had several that rose over the sides of the cups way too much. If you're like me, you'll feel like there's not enough batter to stretch to 12 cupcakes ... but there really is.
Created using The Recipes Generator


You might also enjoy these other scrumptious cupcake recipes:


The BEST Vanilla Cupcake & the BEST Coffee Buttercream Frosting.  Total yum!  #cupcakes #coffeefrosting #vanillacupcakes #cupcakerecipes  www.thekitchenismyplayground.com


Affiliate links are included in this post. I receive a small amount of compensation for anything purchased from these links at Amazon.com at no additional cost to you.


99
Blog Design: Tracimichele.com. Powered by Blogger.