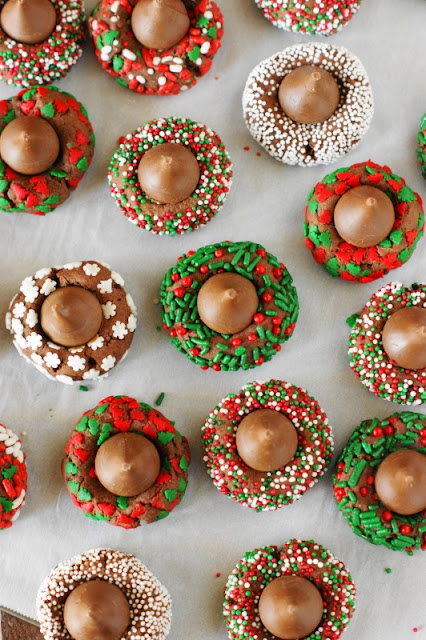
Spread some holiday cheer with these adorable little Christmas Chocolate Kiss Cookies. They're a great cookie project for grown-ups and kids alike because they're just plain fun to make ... and to eat!
CLICK HERE TO PIN THIS FOR LATER
CLICK HERE TO PIN THIS FOR LATER
Our 6-year-old daughter Little Miss H. and I did our first round of Christmas baking this past weekend, kicking off the season with these little beauties.
I don't know who had more fun making them ~ me, or Little Miss. I think it was probably a tie. Because you know what? No matter what your age, making something with sprinkles is just plain fun.
Yes, these fun & festive cookies are a great project for grown-ups and kids alike.
I keep a pretty good assortment of sprinkles on hand, typically picking up holiday-specific ones after each holiday when they're on sale. It's a great practice to get in the habit of doing if you like to bake a lot like we do ... then when you want to make something extra-fun like these cookies, all you have to do is reach into the cabinet and pull out a great selection of sprinkles perfect for the job!
For these cookies, Little Miss H. and I poured a little bit of several sprinkle selections into small individual bowls. Then we just randomly adorned each cookie as we went along so we ended up with a good assortment of different sprinkles on the finished cookies.
I'm hard-pressed to pick a favorite ... but I think it's a tie between the white snowflakes and the green & red holly berry ones. Little Miss had no trouble choosing her favorite ... she likes the red/green/white non-pareils the best. But regardless, a cookie jar sure looks pretty stacked full with a batch of these.
To make these is pretty simple, as they're simply a sprinkle-adorned chocolate-take on the classic Peanut Butter Blossom thumbprint cookie.
I use our favorite chocolate thumbprint cookie dough from our favorite Insanely Delicious Turtle Cookies ... it's a rich, dark chocolate cookie dough that doesn't use any levener. That means the cookies won't spread or change shape really at all when baking ... which is good for a thumbprint-type cookie. You want the indentation you create with your thumb to stay pretty much as you make it so it's good for whatever filling you're putting in ... in this case, a Hershey chocolate Kiss.
Once the dough is mixed and chilled, form it into small balls and then roll each ball in sprinkles. Make sure each dough ball gets completely covered in sprinkles to create the best look.
Press your thumb into each sprinkle-covered ball ...
And then you'll have a batch of fun-&-festive adorable little Christmas Chocolate Kiss Cookies, ready to spread some holiday cheer.
They're such a fun cookie project for grown-ups and kids alike because they're just plain fun to make ... and just plain fun to eat, too!
Check out these other totally fun & festive Christmas cookies:
- Old-Fashioned Fruitcake Cookies
- Candied Cherry Christmas Chocolate Chip Cookies
- Classic Candy Cane Cookies
- White Chocolate Christmas Krispie Treats
- Peppermint Snowball Cookies
- Peppermint Chocolate Chip Snowball Cookies
- Red Velvet Snowball Cookies
- Christmas Homemade Thin Mints
- Chocolate Covered Peppermint Ritz Cookies
- Christmas Chocolate Layer Bars
- Christmas White Chocolate-Dipped Sugar Wafers
- Grinch White Chocolate Sugar Wafers
- Christmas Sprinkle-Coated Sugar Cookies
- More cookie recipes
Thank you for stopping by The Kitchen is My Playground. We'd love to have you back soon!
Yield: about 25-30 cookies

Christmas Chocolate Kiss Cookies
Spread some holiday cheer with these adorable little Christmas Chocolate Kiss Cookies. They're a great cookie project for grown-ups and kids alike because they're just plain fun to make ... and to eat!
prep time: 1 H & 30 Mcook time: 12 Mtotal time: 1 H & 42 M
ingredients:
- 1 c. all-purpose flour
- 1/3 c. cocoa powder
- 1/4 tsp. salt
- 8 T. (1 stick) unsalted butter, softened
- 2/3 c. sugar
- 1 egg yolk
- 2 T. milk
- 1 tsp. vanilla extract
- 3/4 to 1 c. assorted Christmas sprinkles
- 25 to 30 Hershey Kisses, unwrapped
instructions:
How to cook Christmas Chocolate Kiss Cookies
- Combine flour, cocoa, and salt; set aside.
- With an electric mixer on medium-high speed, beat butter and sugar until light and fluffy, about 2 minutes. Add egg yolk, milk, and vanilla; mix until incorporated. Reduce mixer speed to low and add the flour mixture until just combined.
- Wrap dough in plastic wrap and refrigerate until firm, 1 hour.
- With your hands, roll chilled dough into 1-inch balls and roll each ball in sprinkles, completely covering the dough ball with sprinkles. Place balls about 2 inches apart on a baking sheet. With your thumb, gently press down into the center of each ball just slightly to make a small indentation. Chill the baking sheet of dough balls in the refrigerator for 10 to 15 minutes before baking. {This chilling time makes the cookies bake up soft and tender, and helps minimize spreading. I have skipped this chill before, and the cookies came out on the dry side ... so I don't recommend skipping it.}
- Bake at 350℉ until set, about 12 minutes.
- After removing cookies from the oven, immediately place a Hershey Kiss in the center of each cookie. {Once you place the Kiss, leave it be. Twisting or moving it will cause it to start to melt and pool at the bottom.} Let cookies cool on the baking sheet for about 3 minutes, remove to a cooling rack to cool.
TRACEY'S NOTES
- There is indeed no leavener in this recipe - that is not a typo.
- These cookies don't spread or change shape much while baking. They just puff very slightly.
- I have not had much success with using Hugs, Candy Cane, etc. flavor Hershey Kisses. They melt too quickly and easily and just end up pools of white chocolate in the cookies. I recommend sticking with "traditional" Hershey Kisses.
Affiliate
links are included in this post. I receive a small amount of compensation for
anything purchased from these links at Amazon.com, at no additional cost to you.


Hi Tracey,
ReplyDeleteYour Christmas Chocolate Kiss Cookies look fantastic! Thanks so much for sharing with us at Full Plate Thursday and have a great week!
Miz Helen
I love baking with sprinkles! Your Christmas Chocolate Kiss Cookies look wonderful. Thank you for sharing them with us at Hearth and Soul. Scheduled to pin!
ReplyDeleteI love your take on these classic cookie. I just bought some Hershey kisses and I am going to try yours. Thanks for the ideas.
ReplyDeleteBev
These are so cute. I bet extra yummy too. Thanks for sharing.
ReplyDeleteDo we use unsweetened cocoa powder? That's what I have on hand so just curious if that will work! Thank you for sharing, these look so cute!
ReplyDeleteYes, "cocoa powder" is unsweetened cocoa powder. Enjoy!
DeleteBaking with sprinkles is fun! Love your Christmas Chocolate Kiss Cookies - they look very addictive! Scheduled to tweet and pin. Thank you for sharing with Hearth and Soul.
ReplyDeleteThank you so much for this great recipe! It was a big hit at my cookie swap, and I'll be using it again soon. The pictures and instructions were a great help.
ReplyDeleteI wonder if you could freeze the Hershey's hugs, etc and sticking them on frozen. That would keep them from melting so fast it would seem.
ReplyDeleteI think that is a great idea.
DeleteHow do you get the candy sprinkles to stick.The color sugars were very well covered. TIA. Richard
ReplyDeleteHello Dogdad, The sprinkles are actually pressed into the dough of a cookie that sits under the kiss. The kiss is placed on the cookie after baking.
DeleteCan you make the dough the day before and keep in the refrigerator?
ReplyDeleteYes you can; enjoy.
DeleteHow long do these last for?
ReplyDeleteNot long around our house; we love them.
DeleteHow many cookies does this recipe make?
ReplyDeleteabout 25-30.
Delete